How to Create a New Office in PULT
Last updated: January 14, 2026
Let's guide you through the process of creating an office as a resource
Creating a new office in our application is simple, efficient, and customizable.
The application allows you to tailor your office settings to your specific needs.
Here's how you do it:
Step 1: Navigate to "Desks"
Once you have successfully logged into your administrator dashboard, locate the "Desks" button on the left-hand side of the navigation bar. Please click on it.

Step 2: Click on the button "Add Office".
This button is located in the upper right corner of the "Desks" page.
Step 3: Complete the office details
You will be prompted to provide various details:
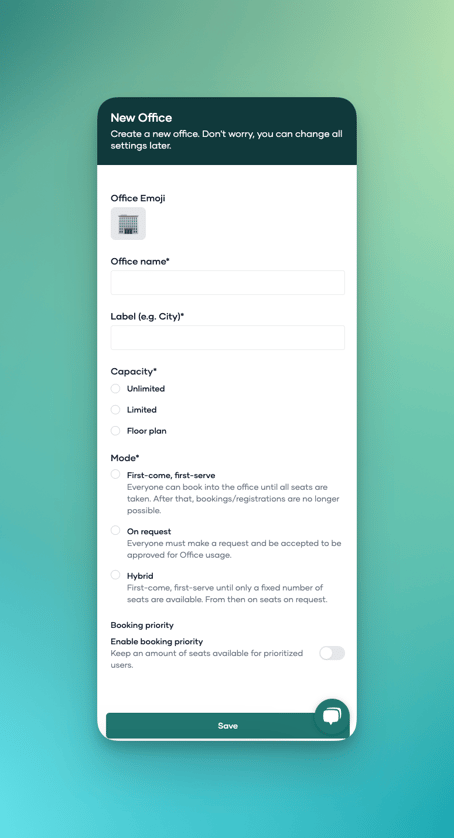
Office Emoji: Pick an emoji that best represents your office. It will be used as the icon for your office in the employee app.
Office Name: Give your office a unique and easily recognizable name. For example, "Apple HQ" or "Apple HQ Floor 1" (if you have multiple floors).
Label: This is typically the city or location of the office. For example, "NYC".
Step 4: Select your capacity mode
Choose between 'Unlimited' or 'Limited'. If you select 'Unlimited', an unlimited number of users can check into the office. With 'Limited', you must specify the maximum number of people who can occupy the office. Both options work without a floor plan.
Step 5: Select a floor plan
If you would like to create a floor plan for your office to book specific desks, click on 'Floor plan' and then on the large green button 'Create floor plan' below. This will take you to the PULT Floorplan Builder. Click here to see how the Floorplan Builder works.
Step 6: Select the booking mode
You can choose how your employees can book a space in the office. These options are only available if you select 'Unlimited' or 'Limited'. If you create a floor plan, 'First-come, First-served' is automatically selected. There are three options:
First-come, first-serve:
With this option, the first people to book a seat get it, and once all seats are taken, no more bookings can be made.
On request:
To book a seat with this option, you'll need to submit a request and get approval.
Hybrid:
This option is a combination of the first two. You can book seats on a first-come, first-served basis until a certain number of seats are left. After that, any remaining seats need to be requested.
Step 7: Activate booking priority (Optional)
If you want to reserve a number of seats for prioritized users, activate 'Booking Priority'. This will reserve some seats for users with a higher priority level. These priority levels can be selected for the respective teams on the 'Teams' page.
💡How do I create teams / groups?
Step 8: Save your settings
Once you have completed all the information and customised your office settings, click on 'Save'. You can change these settings later if you wish. Please note that your chosen settings should reflect the real properties of your office and the company's requirements/guidelines. You can always make changes later.