Setting up kiosk devices

Last updated: April 8, 2026

How to set up and connect kiosk devices to Pult.


image.png

Using our Add-on, visitors can quickly register themselves using the intuitive touchscreen interface, reducing wait times and streamlining the process.

Get your new Pult kiosk up and running quickly with this easy guide. This article will walk you through the simple steps to connect your kiosk device to the Pult platform.

  1. On your kiosk device, navigate to the App Store and download the following app https://apps.apple.com/es/app/pult-visitors-kiosk/id6535653947.

    You will be greeted by a screen with a code. 

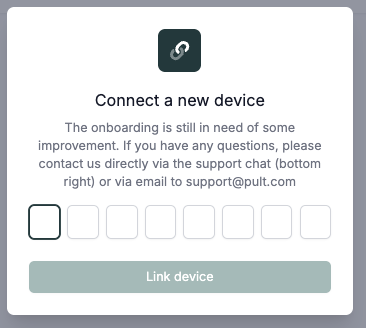
  2. On your computer: Sign in to the Pult dashboard and navigate to Kiosks in the Settings section. Click on Connect new device

  3. Enter the code that is displayed on your kiosk device into the fields below and click on Link device

  4. Accept the pair request on your kiosk device

You will now see your device under Settings-> Kiosks:

Kiosk.png

Simply repeat the steps above if you would like to add more devices.

2. Configuring Kiosk Settings

When you click on a kiosk, you can adjust its settings directly in the dashboard.

CleanShot 2026-04-08 at 14.56.51.png

  1. Name & Location: Give your kiosk a name and assign it to a location.

  2. Visitor Flow: Select which flow should be used for new guests during check-in when no visitor type has been assigned to them. Note: Flows must already be set up in advance.

  3. Visitor Flow for Ad-hoc Guests: Select which flow should be used for new ad-hoc guests during check-in when no visitor type has been assigned to them. Note: Flows must already be set up in advance.

  4. Linked Offices: Choose which offices should be connected to this kiosk device.

  5. Visitor Types: Define which visitor types are displayed on the device. Leave the field empty to show all available visitor types.

  6. Allow Non-Guest Check-in: When enabled, regular PULT users can log in at the kiosk and confirm their bookings. (Requires desk booking to be integrated.)

  7. QR Code Check-in: When enabled, guests can check in via a QR code using their own device.

  8. Unlock Device Settings: When enabled, device settings can be configured directly on the kiosk.

  9. Re-link Device: If any errors occur, this option allows you to re-link the device.

  10. Delete Kiosk: Use this option to permanently remove the kiosk.

Please reach out to our support team if you require assistance during the set up process.