How do visitors check in on a kiosk device?
Last updated: October 21, 2026
This article shows what the check-in looks like for visitors on a kiosk – in the PULT Visitors Kiosk app on an iPad or in the browser kiosk – and which settings change what your visitors see.
📌 Kiosk app: Use the PULT Visitors Kiosk app on an iPad – only then are all kiosk features available. Always install the latest version (currently version 1.28, requires iPadOS 17.2 or later). The browser kiosk (e.g. on Android tablets) works too, but some features such as badge printing are not available there (see Use the PULT Kiosk in a Browser (Android and Other Tablets)).
📌 Subscription required: The features below are only available with the Visitors add-on.
Start screen
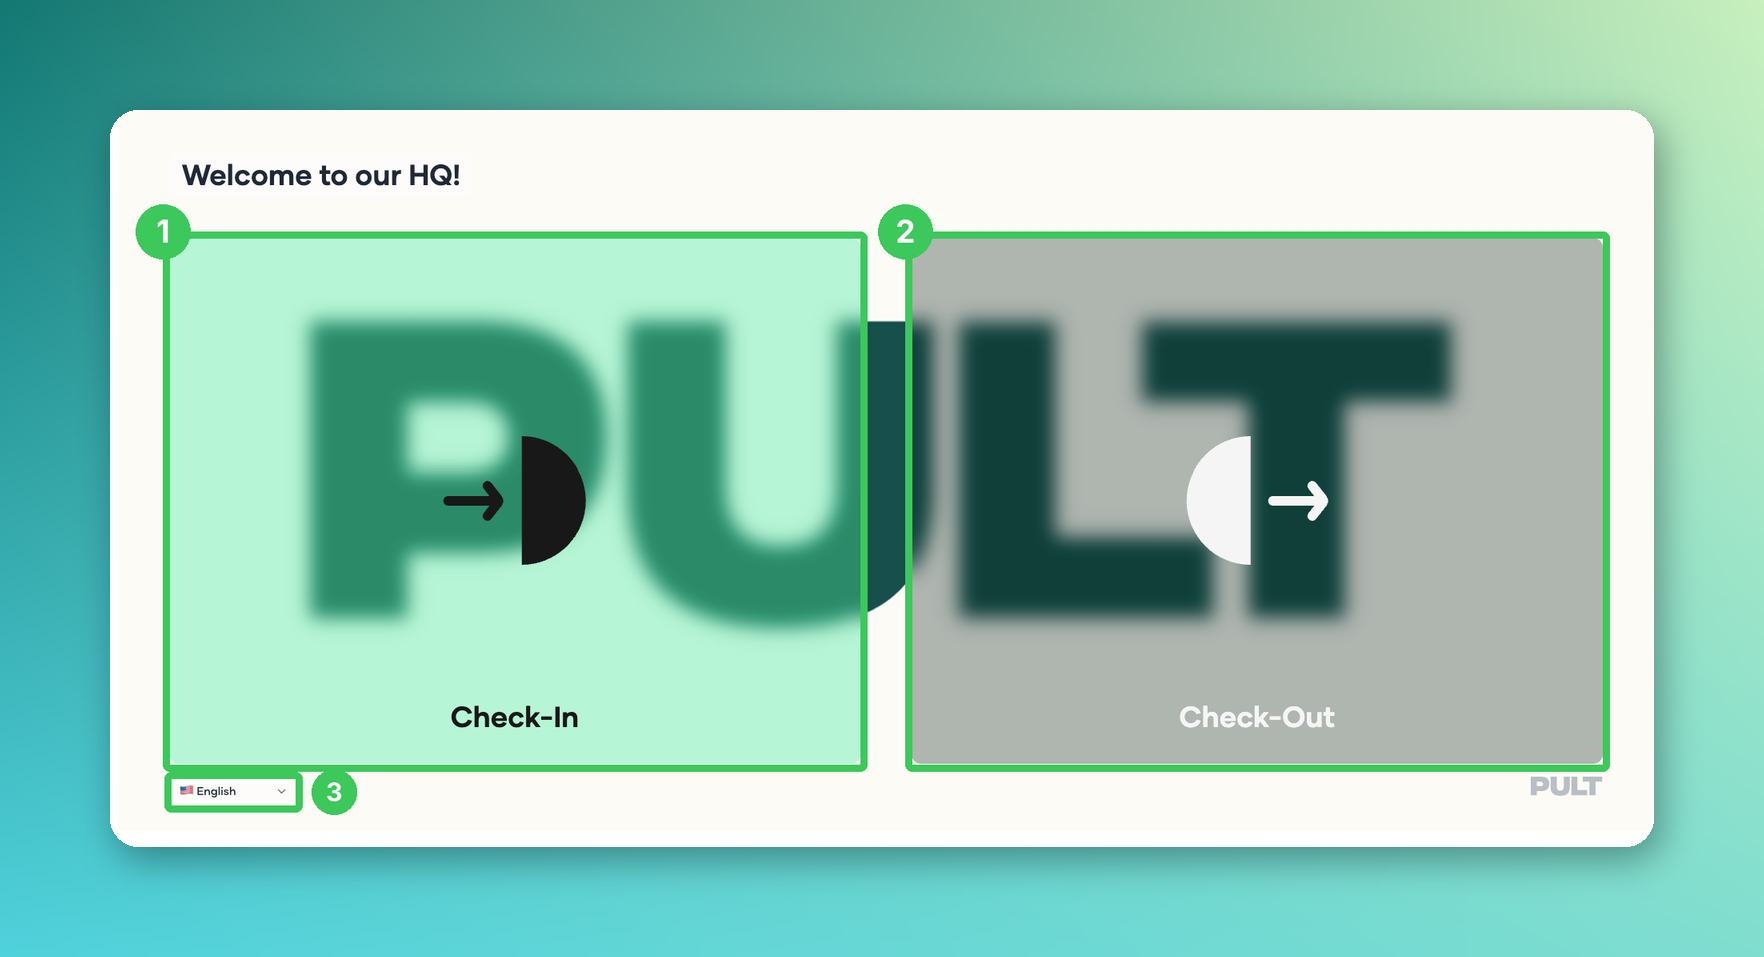
1. Check-In
Visitors tap here to start their check-in.
2. Check-Out
Visitors tap here when they leave (see below).
3. Language
Visitors choose their language here. Which languages a kiosk offers and which one is the default is set per kiosk under Kiosk languages (see Kiosk Device Settings). After each visitor, the kiosk switches back to the default language. The welcome text and background image are also set per kiosk, the kiosk colors in Guest Booking Settings.
Find the invitation
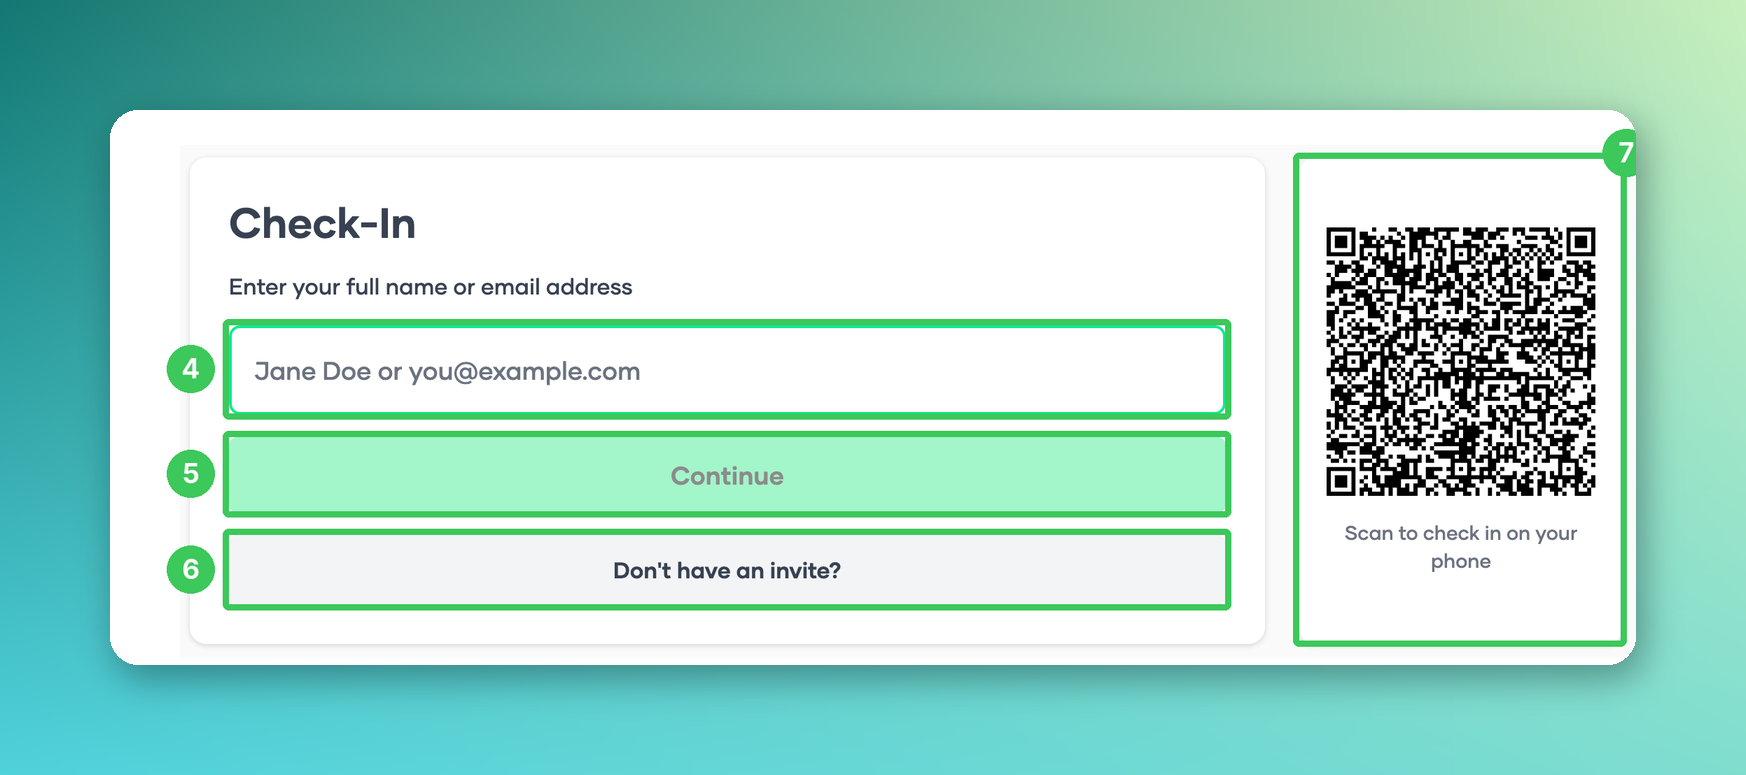
4. Name or email address
Visitors enter their full name or email address. If Search privacy mode is switched on for the kiosk, a visit is only found with the complete email address (see Kiosk Device Settings).
5. Continue
Searches for the visit and starts the check-in flow.
6. Don't have an invite?
Opens the walk-in form for visitors without an invitation (see below).
7. QR code
If QR code check-in is switched on, visitors can scan the code and check in on their own phone (see Visitor Management: QR Code Check-in).
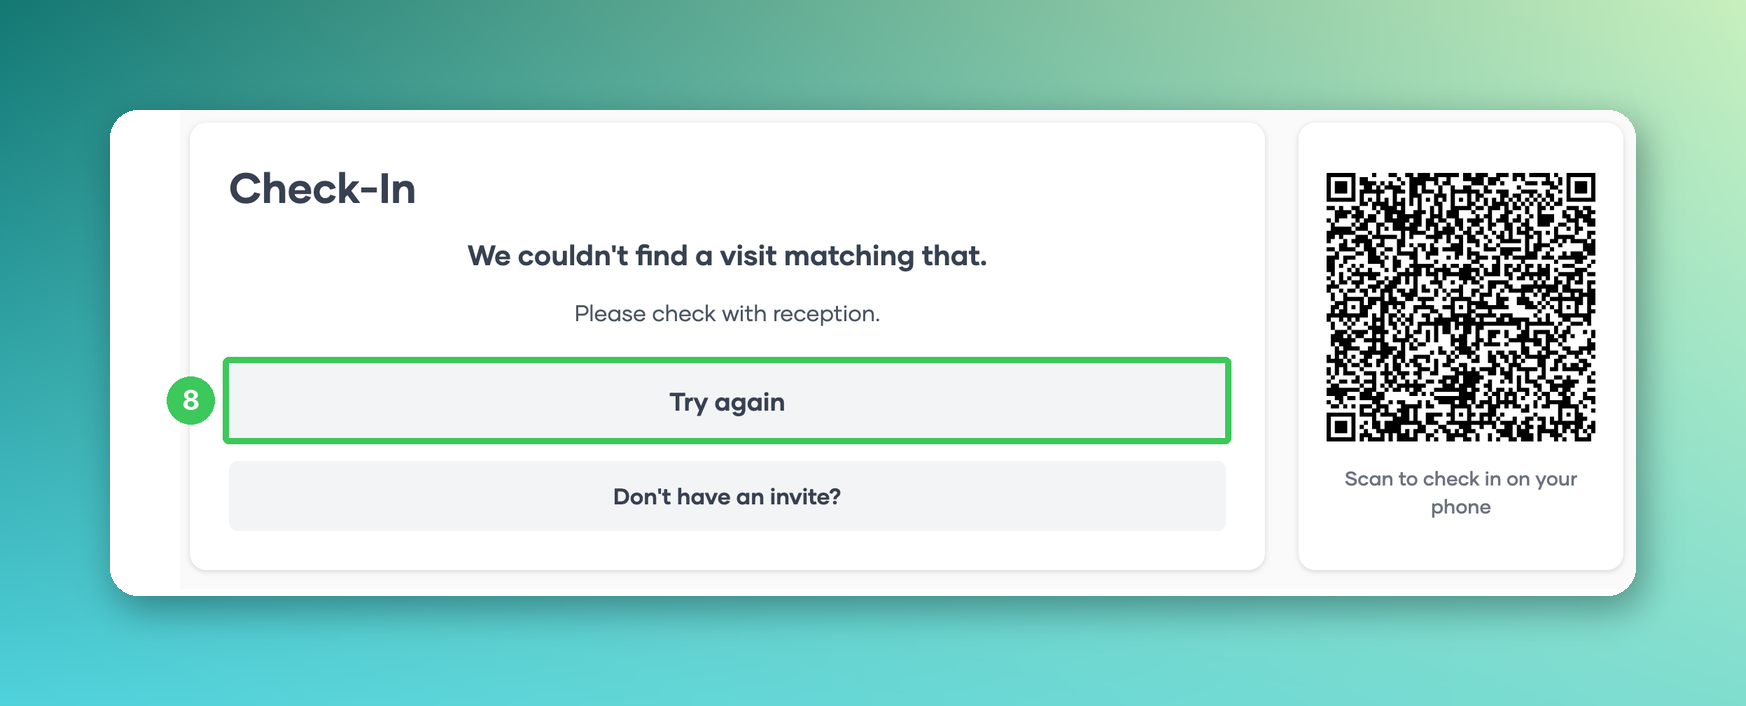
8. Try again
If no matching visit is found, visitors can try again or check in via Don't have an invite?. Common reasons: a typo in the name or email, or the visit belongs to an office that is not linked to this kiosk.
Visitors without an invitation
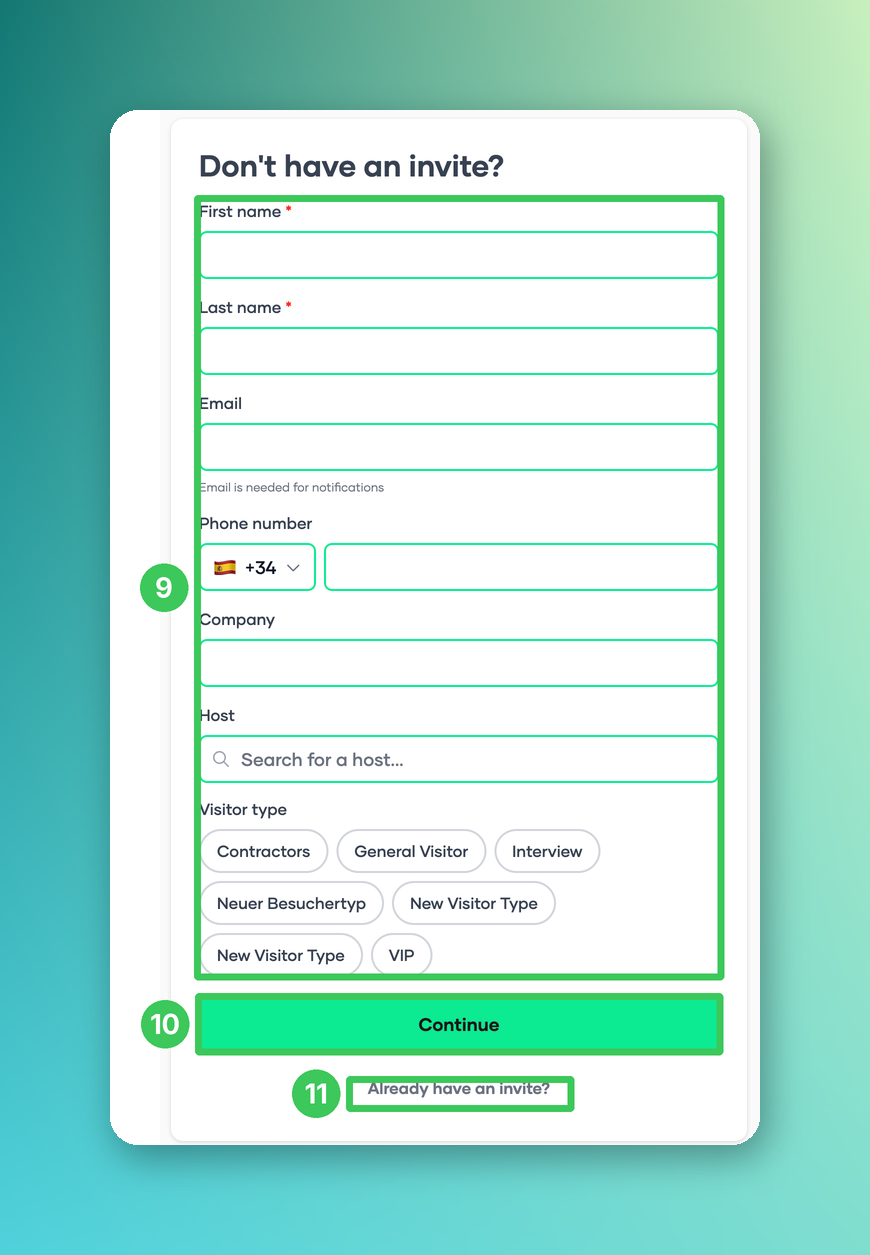
9. Visitor details
Walk-in visitors enter their details here. Which fields are shown, optional or required – including the host – is set under Settings → Visitors → Walk-ins (see Kiosk Check-In Form for Ad-Hoc / Walk-In Guests).
10. Continue
Starts the check-in flow for walk-in visitors (see Set a separate flow for Ad Hoc visitors).
11. Already have an invite?
Takes visitors back to the search. If Walk-in only is switched on for the kiosk, the kiosk opens directly on this form.
The check-in flow
After the search (or the walk-in form), visitors go through the flow of their visitor type. Depending on your settings, it includes:
Welcome message (see Add welcome and check-in/out messages to flows for Visitors)
Questions – questions marked First visit only are skipped for repeat visitors (see Add questions to flows for Visitors)
Documents and signature – depending on the signature validity of each document (see Add documents to flows for Visitors)
Privacy notice, if set up for the kiosk
Badge printing – only with the iPad app (see Visitor Badge Editor: Design your own visitor badges)
Check-in message – after that, the host is notified and the visitor receives one email with all documents they signed (see Visitor Notifications: Who Is Notified When?)
Check-out
When leaving, visitors tap Check-Out (2) and search for their visit the same way. They then see the check-out message of their flow. Visitors who are still checked in at midnight can be checked out automatically (see Automatic End-of-Day Visitor Checkout).
Frequently asked questions
A visitor can't find their invitation. What should I check?
Check the spelling of the name or email, that the visit is for today and that the office of the visit is linked to this kiosk (see Kiosk Device Settings).
Can the kiosk greet visitors formally?
Yes, with Address visitors formally (see Guest Booking Settings).
Does the check-in also work on Android tablets?
Yes, with the browser kiosk (see Use the PULT Kiosk in a Browser (Android and Other Tablets)). Badge printing is only possible with the iPad app.
Related articles
If you have any questions, feel free to contact our support team at support@pult.com.